156L
Pixel Art
A Quick Visual Guide
20 June 2024
SITE
⠀⠀⠀about
⠀⠀⠀home
⠀⠀⠀gallery
⠀⠀⠀tutorial
COMMISSION RELATED
⠀⠀⠀prices
⠀⠀⠀tncs
⠀⠀⠀links/contact ↗
art + code + website : 156L ⊹ 2020 - 2024
I didn't really have much motivation or reason to make this page aside from "I don't think people would like to watch a video because I also hate video guides." So here's a step by step tutorial.

Directory :
‣programs and intro
I use only Paint Tool SAI, really. I wasn't really a fan of Aseprite because i don't think i need something that comprehensive to make a 2 frame animation. Also SAI had the dot pen and that was all i needed after the initial sketch. I have tried using CSP before but after downloading a user-made asset for a binary oen it LOVED to double dip and draw "smudgy" lines, and cleaning that up was painful. So SAI it is! so obviously what you are gonna need is an image of whatever you are doing, a sketch essentially, and at what size you are doing it. you need to understand that in pixel art, bigger = requires more detail, and just going up from 256px to bigger sizes is already a big ask. at 256px, there is so much detail that you can put in it!
Step 1: Sketch
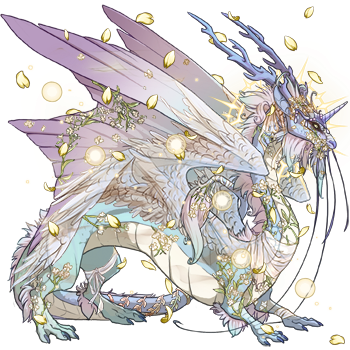
in my commissions and personal drawings, I use 256px. Let's use a commission that i've just done for a user on flight rising. they have a dragon that they have dressed up, and would like me to work on it. i send 2 sketches and this is the one that they prefer over the two. Everything will be drawn in this 256px box and finished in here!
You may notice that the dragon is very "busy" and has many things going on. Don't fret! Just sketch a normal drawing, as if you are doing an illustration.
![]()
Step 2: Lineart
lower the opacity of the sketch, and start freehanding separate parts of the thing you are doing on new layers above it.
you might wonder why i do this! it's so that it is easier to do simple bobbing animations, without needing to edit the whole artwork. think of them as paper dolls that you can move separately. draw the parts on separate layers, like the tail,and then the wings. ignore the apparel, or shading and the like. the transparent image would look something like this :
![]()
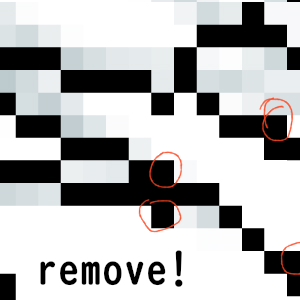
once you have nailed the separate pieces, clean the thick double line edges that might have formed while drawing. if uncleaned, they will leave a strange "smudgy" and uncrisp look.
Step 3: Add Solid Colour Bands
Now you are going to add colour to these transparent pieces! Select the inside of the lineart, and on a new empty layer, add bands of colour from your reference. still don't add any details, like markings if your character has them. for ease of example, I will be colouring this wing only.

![]()
Step 4 + 5: Dithering and Colouring the Lines
This one's the fun part! Most users would notice this pattern of dots when viewing pixel art. This is called Dithering, and they come in various different shapes and intensities and you can control them to make gentle colour transitions or even patterns.
Back then artists would hand draw and save these patterns, but these days they can be easily made in two clicks in aseprite, or a website like Lunar Labs' Dither Machine that helps you make these gradients.
You can also use this gradient I have here. it is transparent, and all you have to is clip this to the colour layer, and recolour by using Alpha Lock. It will look like this :
![]()
![]()
Once you have recoloured the dither, you can now colour in the linework for the wing for a less harsh look! The colour I pick is a slightly darker version of the gradient, so that the entire wing looks "cohesive". When I am done, I merge the dither to the colour, and then the lineart to the colour, for a complete wing. Repeat this process for the rest of the parts, erasing and adjusting the gradient as required.
![]()
Step 6: Continuation and finishing of Dither
Once you have fully repeated the process of adding colour bands, dithering, and colouring the lineart, it will look some thing like this. it's a bit empty for now, but we will add its clothes later. At this step, ensure all the individual body parts are still separated and not all merged together.
It's a good time to mention that you can add your patterns at this step. For example, your dragon has some spots on the tail. Create a new layer, change its blending mode to "Multiply", and paint out the pattern on the tail!
![]()
![]()
Step 7: Apparel Drawing!
Create a folder and put all the dragon body parts into it. Outside of the folder, create a new layer. This is where we will be drawing all the apparel. In this dragon's case, there are many vines on its body, flowers, and some silks. As you draw the little details, take care that they do not overlap too close, as you will slowly cut and paste them onto the respective parts, like stickers. You can add a sense of "depth" and contrast by giving these objects lineart.
To add lineart to your apparel :
- select the empty space
- create new layer under the apparel
- Invert Selection
- Increase selection by 1 pixel
- Use Fill Tool
- Finally, merge the Fill and Apparel layers.
![]()
Once you have done this, you can start on the process of cutting, pasting it onto the body part, and merging layer. The result would look something similar to below.
![]()
Step 8: Cleanup and Wing Glow
Almost there!
Everything should be almost complete at this point. One of the magic tricks I use to create a sense of depth is by simply adding a "glow" border on the wing and head area.]
To do this, repeat the steps above, but for the wing layer. Fill with a bright colour (not pure white, something pastel-ly! gold usually works best.) in order to show the contrast between it and the rest of the body.With this, and some effort of individual layer movement, you are done!
![]()
in my videos, i would title them "witness the jank", because you can fully see the process as it happens on screen. welcome witnessing the jank, in text format! thanks for stopping by and reading this tutorial.